

DeviceURL for VEX Brain Node.js is a leading platform in educational robotics, empowering students to design, build, and program robots. At the heart of every VEX robot lies the VEX Brain, the central processing unit responsible for controlling the robot’s actions. The VEX Brain is a highly advanced piece of technology that integrates sensors, motors, and other robotic components to allow real-time interaction between the robot and its environment.
Node.js, on the other hand, is a popular JavaScript runtime that allows developers to create scalable network applications. It is highly valued for its speed, simplicity, and ability to handle asynchronous operations. Node.js has found a significant role in robotics due to its flexibility and ease of integrating with different hardware systems. Combining Node.js with the VEX Brain enables advanced control, automation, and data processing for robotics applications.
One key concept for ensuring smooth communication between the VEX Brain and Node.js is the DeviceURL.
What is DeviceURL?
The DeviceURL is essentially a unique identifier that includes the IP address and port number of the VEX Brain. This URL allows Node.js applications to locate and establish communication with the VEX Brain within a local network. It functions much like a web URL, but instead of connecting to a website, the DeviceURL connects your Node.js application to the robot’s brain, allowing for command transmission and data retrieval.
By using the DeviceURL, you can control the robot in real-time, access sensor data, and program sophisticated robotic behaviors.
How DeviceURL Works with Node.js
The DeviceURL plays a pivotal role in establishing a connection between the Node.js application and the VEX Brain. Here’s how the process typically works:
- Connection Setup: Node.js uses the DeviceURL to establish a direct link to the VEX Brain. This connection allows the two systems to communicate over a local network. The IP address within the DeviceURL identifies the VEX Brain, while the port number directs the Node.js application to the correct communication channel.
- Data Communication: After the connection is established, Node.js can send commands to the VEX Brain, controlling motors, sensors, and other components. Likewise, the VEX Brain can send real-time data back to Node.js for processing, such as sensor readings.
- Real-Time Control: Since robotic applications require precise timing, the DeviceURL ensures that Node.js can send and receive data from the VEX Brain in real-time. This is critical for dynamic operations, such as adjusting the robot’s behavior based on immediate environmental feedback.
Finding the DeviceURL for VEX Brain
Locating the DeviceURL is a straightforward process, but it requires a few steps to ensure that your VEX Brain is properly connected to a network. Here’s a simple guide:
- Connect the VEX Brain to the Network: Ensure that the VEX Brain is connected to the same local network as the computer running your Node.js application. You can connect the Brain to a Wi-Fi network or use an Ethernet connection.
- Access the VEX Brain Interface: Once the VEX Brain is connected, you’ll need to access its interface. This can usually be done through a web browser or by using specific VEX software designed for robot management.
- Locate the DeviceURL: In the interface, navigate to the network settings or device information section. The DeviceURL, which includes the IP address and port number, will be displayed here. Make note of this information, as it is crucial for establishing a connection from your Node.js application.
Programming with DeviceURL in Node.js
Once you have the DeviceURL, you can begin integrating it into your Node.js application to communicate with the VEX Brain. Here’s a general approach to using the DeviceURL with Node.js:
- Install Required Node.js Libraries: Before you can start, make sure you have installed any necessary Node.js libraries that can interact with the VEX Brain. Common libraries for network communication include axios for sending HTTP requests or net for TCP/IP connections.
- Configure the Connection: In your Node.js code, use the DeviceURL to set up a connection with the VEX Brain. This typically involves specifying the IP address and port number.
- Send Commands and Receive Data: With the connection established, you can send commands to the VEX Brain to control the robot’s actions. You can also receive data from the robot’s sensors and process it in real time.
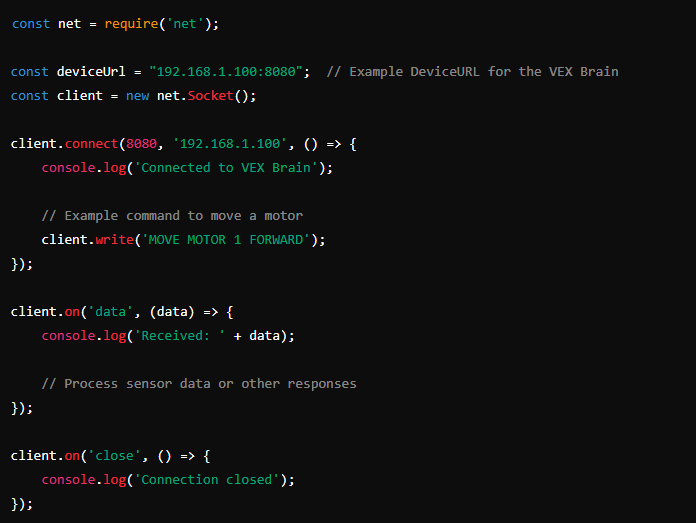
Example Code Snippet
Benefits of Using DeviceURL
The DeviceURL offers several key advantages when working with Node.js and the VEX Brain:
- Efficient Communication: The DeviceURL enables fast and reliable communication between the Node.js application and the robot. This is essential for robotics projects that require precise timing and real-time control.
- Enhanced Control: By using Node.js to interact with the VEX Brain, developers can create more advanced and responsive robot behaviors. Whether it’s controlling motors or retrieving sensor data, the DeviceURL allows for seamless interaction.
- Integration with Other Systems: The DeviceURL allows for easy integration with other technologies and platforms. For example, you can use Node.js to connect the VEX Brain to cloud services, databases, or other IoT devices, significantly expanding the functionality of your robotics project.
Troubleshooting Common Issues
When working with DeviceURL and Node.js, you may encounter some common issues. Here are some troubleshooting tips:
- Connection Problems: If your Node.js application cannot connect to the VEX Brain, double-check that both the robot and the computer are on the same local network. Also, verify that the IP address and port number in the DeviceURL are correct.
- Network Restrictions: Ensure that firewalls or other network restrictions are not blocking the connection. You may need to configure your network settings to allow communication with the VEX Brain.
- Software Compatibility: Always make sure that both the Node.js environment and the VEX Brain firmware are up to date. Outdated software can lead to compatibility issues and prevent a successful connection.
Best Practices for Using DeviceURL
- Use Secure Connections: When transmitting sensitive data, consider using HTTPS or other secure protocols to protect your communication between Node.js and the VEX Brain.
- Implement Error Handling: In your Node.js application, make sure to include proper error handling to manage connection failures or unexpected responses from the VEX Brain.
- Monitor Performance: Regularly check the performance of your Node.js application and the VEX Brain to ensure smooth operation.
Conclusion About DeviceURL for VEX Brain Node.js
The DeviceURL is an essential element in enabling communication between Node.js applications and the VEX Brain. By understanding how to locate and use the DeviceURL, developers can create sophisticated robotics projects that take advantage of Node.js’s capabilities. From controlling motors to processing sensor data, the DeviceURL allows for real-time interaction, efficient communication, and seamless integration with other systems. As robotics continues to evolve, mastering the use of DeviceURL with Node.js will become increasingly valuable for developers looking to push the boundaries of what their robots can do.